SpringBoot 400問題排查
问题描述
自从实体类加入了 date类型字段,然后请求体里面没有这个请求,然后莫名奇妙的事情出现了,无论怎么发送,始终无法进入 submit()方法,同样的handDate类型为Date,却能正常执行,究其原因是,handDate为必填,gmtCreate为非必填(本来打算这个pojo多处使用的,增加了附加字段gmtUpadate)


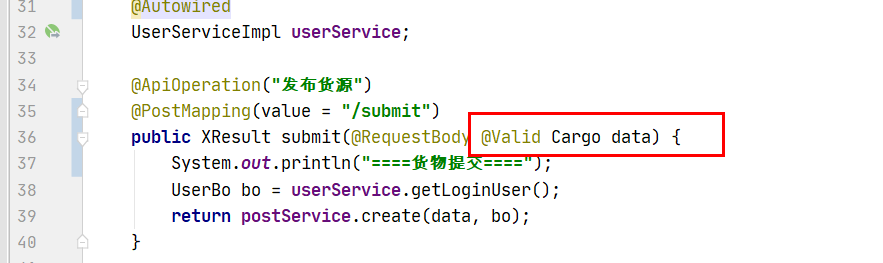
注意参数中的实体类,看看它是不是有特殊的字段!
多数情况是因为特殊字段导致的。
测试了很多次,发现最终如下(日期格式错误)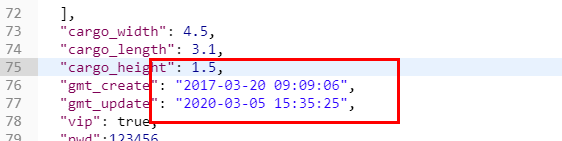
自从实体类加入了 date类型字段,然后请求体里面没有这个请求,然后莫名奇妙的事情出现了,无论怎么发送,始终无法进入 submit()方法,同样的handDate类型为Date,却能正常执行,究其原因是,handDate为必填,gmtCreate为非必填(本来打算这个pojo多处使用的,增加了附加字段gmtUpadate)
注意参数中的实体类,看看它是不是有特殊的字段!
多数情况是因为特殊字段导致的。
测试了很多次,发现最终如下(日期格式错误)
手机端会员中心头像上传是个基本的功能需求,目前手机照片像素越来越大,有的甚至超过10M,对于普通的PHP主机来说,不特殊配置根本无法上传,如何通过手机端浏览器自带的api进行上传前缩放,是解决这个问题的有效方法
利用FileReader对象读取上传文件,然后通过canvas缩放,转成base64字符上传,头像的尺寸不要太大,宽度400像素足够用,这样一张超大图片压缩后才60KB左右,非常节省带宽。
服务端用PHP对base64进行解码
html容器代码
<div class="img" style="position: relative">
<input type="file" onchange="fileSelected(this);" accept="image/*" style="position: absolute;width: 100%;height: 100%;z-index: 999;opacity: 0;">
<img class="avatar" style="width: 80px;height: auto;" src="./images/img_user.png"/>
</div>

<div id="image-tmp-div" style="position:absolute;opacity: 0;width: 400px;overflow: hidden;left: -400px;">
    <img src="" id="image-tmp"/>
    <canvas id="canvas-tmp"/>
</div>
javascript代码
    function fileSelected(obj) {
        var MAX_WIDTH = 400;
        var oFile = obj.files[0];
        var oImage = document.getElementById('image-tmp');
        // prepare HTML5 FileReader
        var canvas = document.getElementById("canvas-tmp");
        var oReader = new FileReader();
        oReader.onload = function (e) {
            oImage.src = e.target.result;
            oImage.src = "data:application/octet-stream;" + e.target.result.substr(e.target.result.indexOf("base64,"));
            oImage.onload = function () { // binding onload event
                if (oImage.width > MAX_WIDTH) {
                    // 宽度等比例缩放 *=
                    oImage.width = MAX_WIDTH;
                    oImage.height *= MAX_WIDTH / oImage.width;
                }
                var ctx = canvas.getContext("2d");
                ctx.clearRect(0, 0, canvas.width, canvas.height);
                canvas.width = oImage.width;
                canvas.height = oImage.height;
                ctx.drawImage(oImage, 0, 0, oImage.width, oImage.height);
                var picData = canvas.toDataURL("image/png");
                $.ajax({
                    type: "POST",
                    url: "{:url('upload')}",
                    data: {"img_data": picData},
                    success: function (r) {
                        if (r.code !== 1) {
                            alert(r.msg);
                            return;
                        }
                        $('.avatar').attr("src", "{:UPLOAD_PATH}" + r.url + "?" + Math.random());
                    },
                    error: function (err) {
                        alert('操作失败,请联系管理员');
                    }
                });
            };
            oImage.onerror = function () {
                alert('没有缩略图,请返回重试');
            }
        };
        oReader.readAsDataURL(oFile);
    }
php代码
class Upload {
public function idpath($id) {
        $id = abs(intval($id));
        $id = sprintf("%09d", $id);
        $dir1 = substr($id, 0, 3);
        $dir2 = substr($id, 3, 2);
        $dir3 = substr($id, 5, 2);
        return $dir1 . '/' . $dir2 . '/' . $dir3 . '/';
    }

    public function bybase64($imgid, $dir, $base64_str) {
        $dest_dir = UPLOAD_ROOT . $dir . '/' . $this->idpath($imgid);
        ac('file::mkdir', $dest_dir);
        list($ext, $tmp) = explode(';base64,', $base64_str);
        if (empty($tmp)) {
            return array('url' => '');
        }
        $ext = 'jpg';
        $targetFile = $dest_dir . $imgid . '.' . $ext;
        //用string读取
        $tmp = imagecreatefromstring(base64_decode($tmp));
        $w = imagesx($tmp);
        $h = imagesy($tmp);
        $simg = imagecreatetruecolor($w, $h);
        $bg = imagecolorallocate($simg, 255, 255, 255);
        imagefill($simg, 0, 0, $bg);
        imagecopyresized($simg, $tmp, 0, 0, 0, 0, $w, $h, $w, $h);
        imagejpeg($simg, $targetFile, 80);
        imagedestroy($simg);
        $ret = array('url' => substr($targetFile, strlen(UPLOAD_ROOT)));
        $ret['width'] = $w;
        $ret['height'] = $h;
        return $ret;
    }
}

 // ProfileController.php控制器
  public function uploadAction(Request $request) {
        $img = $request->post("img_data");
        if ($img) {
            $data = ac('upload::bybase64', $this->user_id, "avatar", $img);
            if ($data) {
                $data['code'] = 1;
                User::where('id', $this->user_id)->update(['avatar' => $data['url']]);
                ajax_return($data);
            }
        } else {
            $this->error("图片不能为空");
        }
}https://hub.docker.com/_/elasticsearch?tab=tags
https://hub.docker.com/_/redis?tab=tags
https://hub.docker.com/_/mysql?tab=tags
https://hub.docker.com/r/bitnami/mongodb/tags
https://hub.docker.com/_/kibana?tab=tags
#设置运行内存以及
docker run --name es -e "ES_JAVA_OPTS=-Xms256m -Xmx256m" -e " discovery.type=single-node" -d -p 9200:9200 -p 9300:9300 docker.elastic.co/elasticsearch/elasticsearch:6.8.6

docker exec -it es /bin/bash
elasticsearch-plugin install https://github.com/medcl/elasticsearch-analysis-ik/releases/download/v6.8.6/elasticsearch-analysis-ik-6.8.6.zip
docker restart es

#配置数据库目录,防止重启数据库丢失
docker run --name mysql -p 3306:3306 -d -e MYSQL_ROOT_PASSWORD=Kpsy#2005 -v /mydata/mysql_data:/var/lib/mysql mysql:5.7

docker run --name redis -p 6379:6379 -d  -v /mydata/redis_data:/data redis:5.0.7 redis-server --appendonly yes

docker run -p 27017:27017 --name mongo \
-v /mydata/mongo_data:/data/db \
-d bitnami/mongodb:4.2.3

docker run --name kibana -p 5601:5601 \
--link es:es \
-e "elasticsearch.hosts=http://127.0.0.1:9200" \
-d kibana:6.8.6
由于 Java 中的基本类型会有默认值,例如当某个类中存在 private int age ;字段时,创建这个类时, age 会有默认值 当使用 age 属性时,它总会有值,因此在某些情况下,便无法实现使 age 为null 并且在动态 SQL 的部分,如果使用 age != null 进行判断 结果总会为 true ,因而会导致很多隐藏的问题 所以,在实体类中不要使用基本类型 基本类型包括 byte in t short lo float double char boolean
MyBatis强大之处在于它的映射语句,这也是它的魔力所在.由于它的映射语句异常强大,映射器的 XML 文件就显得相对简单.
MyBatis 3.0 相比 2.0 版本的最大变化,就是支持使用接口来调用方法.使用接口调用方式会方便很多, MyBatis 使用 Java 的动态代理可以直接通过接口来调用相应的方法,不需要提供接口的实现类,更不需要在实现类中使用 SqlSession以通过命名空间间接调用
另外,当有多个参数的时候,通过参数注解@Param 设置参数的名字省 去了手动构造Map参数的过程,尤其在Spring中使用的时候,可以配置为自动扫描所有的接口类 ,直接将接口注入需要用到的地方.
接口可以配合 XML 使用,也可以配合注解来使用 XML 可以单独使用,但是注解必须在接口中使用
https://www.bilibili.com/video/av63499215/?p=2
接口存在的意义就是解耦合(老的架构情况下使用的比较多),目的是为了规范,以前分组开发 controller、service等层,利用接口规范开发,目前的spring全家桶利用微服务,每个服务都是单独的最新模块,所以就不用接口了,不用接口来规范了
架构师用来设计架构的,使用的工具PowerDesigner(主要是谈业务用、投资方讲讲架构),不一定是架构师必备的,可以用其他的形式来做,草稿纸等,用其他的建模比如Navicat中的建模工具,弊端是必须打开数据库、链接数据库。使用PowerDesinger不用链接数据库,显得专业
SpringBoot(实现了Spring零配置)+SpringCLoud+SpringMVC+SpringData(屏蔽了各种数据库之间的差异比MyBaits更高级)
用swagger生成,状态码用0、1等太土,建议用2000,20001这种
一般关系增删改查,幂等和安全,如何理解?
GET是查询操作,不会出现脏读、幻读、安全等问题
幂等:操作成功后是否会对数据库造成影响,从另外一个更严谨的层面对数据进行了要求。
插入一条记录,因为网络等等原因,重复操作,内容一模一样,都成功了,但是数据重复了,产生不幂等了
POST插入:不安全不幂等
UPDATE:不安全,同一条更新语句,不安全但是幂等
删除:不安全但是幂等
访问路径一样:POST就是添加、GET就是查询
docker images
启动docker
systemctl start docker
搜索镜像
docker search mysql(镜像名称)
下载镜像
docker pull (复制刚才查找的名称) +版本(一定要加,默认下载的是最新版)
制作容器
docker run
//下载mysql
docker pull mysql:5.7
//制作mysql容器
docker run -p 3306:3306 --name mysql -e MYSQL_ROOT_PASSWORD=123456 -d mysql:5.7
//执行mysql bash命令
docker exec -it mysql bash
//登录MySQL
mysql -uroot -p123456
模块和工程,模块必须在工程之下(IDEA同理)
Response.BODY注解
创建实体类
泛型方法的设置
推特的snowflake算法
分布式的实体类必须实现序列化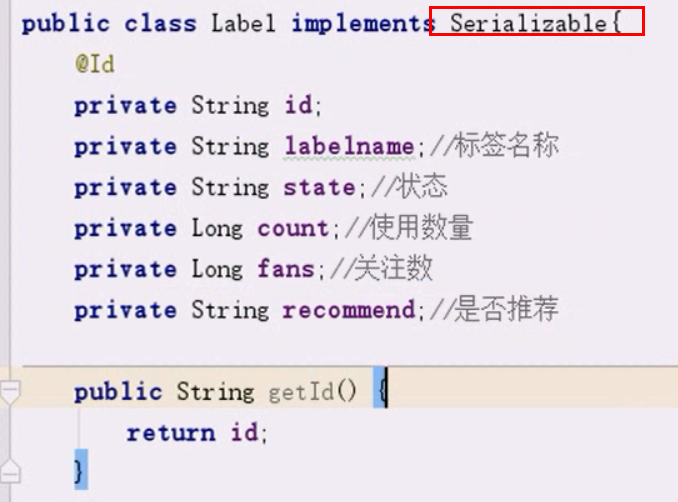
安装elasticsearch,坑点在于内存,不设置小主机运行不起来
docker pull docker.elastic.co/elasticsearch/elasticsearch:7.5.2

docker run --name es -e "ES_JAVA_OPTS=-Xms128m -Xmx128m" -d -p 9200:9200 -p 9300:9300 docker.elastic.co/elasticsearch/elasticsearch:7.5.2
错误:max virtual memory areas vm.max_map_count [65530] is too low, increase to at least [262144]
那说明你设置的 max_map_count 小了,编辑 /etc/sysctl.conf,追加以下内容:vm.max_map_count=262144保存后,执行:sysctl -p重新启动。
配置清单
# ----------------------------------- Memory -----------------------------------
#
# Lock the memory on startup:
#
#bootstrap.memory_lock: true
#
# Make sure that the heap size is set to about half the memory available
# on the system and that the owner of the process is allowed to use this
# limit.
#
# Elasticsearch performs poorly when the system is swapping the memory.
#
# ---------------------------------- Network -----------------------------------
#
# Set the bind address to a specific IP (IPv4 or IPv6):
#
network.host: 0.0.0.0
#
# Set a custom port for HTTP:
#
#http.port: 9200
#http.port: 9200
#
# For more information, consult the network module documentation.
#
# --------------------------------- Discovery ----------------------------------
#
# Pass an initial list of hosts to perform discovery when this node is started:
# The default list of hosts is ["127.0.0.1", "[::1]"]
#
#discovery.seed_hosts: ["host1", "host2"]
#discovery.seed_hosts:["my-application"]
#
# Bootstrap the cluster using an initial set of master-eligible nodes:
#
#cluster.initial_master_nodes: ["node-1", "node-2"]
cluster.initial_master_nodes: ["node-1"]
#
# For more information, consult the discovery and cluster formation module documentation.
#
# ---------------------------------- Gateway -----------------------------------
#
# Block initial recovery after a full cluster restart until N nodes are started:
#
#gateway.recover_after_nodes: 3
#
# For more information, consult the gateway module documentation.
#
# ---------------------------------- Various -----------------------------------
#
# Require explicit names when deleting indices:
#
#action.destructive_requires_name: true
http.cors.enabled: true
http.cors.allow-origin: "*"